Emergency Roof Repair: What to Do When You Can’t Get a Roofer Right Away
Have a question about this topic?
Have a question about this topic?
Ask Roofster — our AI roofing expert is available 24/7.
Ask Roofster — our AI roofing expert is available 24/7.
Your roof is leaking. You have called two or three roofers and nobody can come today. Maybe it is 11 PM. Maybe there is a foot of snow on the roof and no one is going up there until conditions change. You need to protect your home right now, from inside the house, with what you have. This guide walks you through it in order of urgency.
What to Do Right Now (From Inside the House)
Start inside. You do not need to get on the roof to protect your home from further water damage.
Contain the water. Place buckets, towels, or trash cans under every active drip. If water is running along a ceiling or wall, trace it to the lowest point and catch it there.
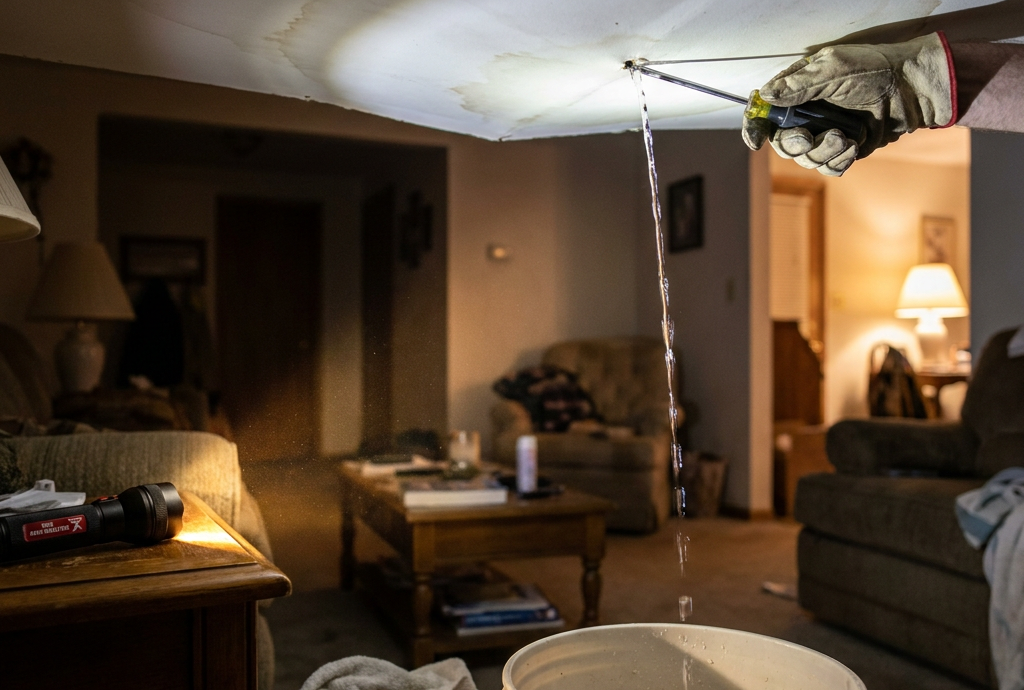
Relieve ceiling pressure. If your ceiling is bulging or sagging with trapped water, poke a small drain hole in the center of the bulge with a screwdriver. Have a bucket underneath. This prevents the weight of pooled water from collapsing the entire ceiling section.
Check for electrical danger. If water is near outlets, light switches, or your breaker panel, turn off the circuit breaker for that area immediately. Water and electricity in the same space is a genuine emergency.
Move what matters. Furniture, electronics, documents, and anything irreplaceable should be pulled away from the water path. Water follows gravity and spreads along ceiling joists, so move things further than you think you need to.
Run a dehumidifier. Moisture trapped in walls and insulation leads to mold growth within 24 to 48 hours. A dehumidifier in the affected room slows that process while you wait for professional help.
Document everything. Before you clean up, photograph and video all the damage. Your insurance company needs this evidence, and your policy likely requires you to take reasonable steps to prevent further damage (insurers call this “mitigation”). Documenting first, then mitigating, protects your claim. For the full insurance process, our guide to filing a roof insurance claim in Michigan walks through each step.
Key takeaway: Interior containment is the first priority. Buckets, a screwdriver for ceiling bulges, and killing power to wet circuits protect your home while you wait for a roofer.
Should You Get on the Roof?
The honest answer: probably not, and definitely not in certain conditions.
When it is reasonable to go up: dry weather, daylight, a low-pitch roof, someone else home with you, and no ice or snow on the surface. If all five conditions are met and you are comfortable on a ladder, a heavy-duty poly tarp (6-mil or thicker) extending at least 4 feet past the damage on all sides, secured with furring strips (thin boards) and screws along the edges, can keep water out for 30 to 90 days.
When to stay off the roof: Active rain or snow. Ice on any surface. Nighttime. Steep pitch. You are alone. Winter temperatures. A wet, icy, or snow-covered roof is genuinely dangerous. Professional roofers use safety harnesses, roof anchors, and rubber-soled shoes, and many will not work on a roof in active precipitation or below-freezing temperatures.
If you cannot safely get up there, that is the right call. Interior containment is your job. Exterior repair is the professional’s. Emergency tarping from a contractor typically runs $300 to $800 and is well worth it when conditions make roof access unsafe. Our guide to temporary roof fixes that hold up until spring covers what works and what does not for longer-term temporary repairs.
Key takeaway: Do not go on a wet, icy, or snow-covered roof. Interior containment keeps your home safe until a professional can handle the exterior.
When It Is an Ice Dam Emergency
Ice dams are Michigan’s most common roof emergency, and no national guide addresses them well.
Here is what happens: heat from inside your home melts snow on the roof deck. That meltwater flows down to the eaves, where it refreezes and forms a ridge of ice. The dam blocks drainage, and water backs up under shingles and into your attic. Left unchecked, this can flood insulation, damage ceilings, and create mold conditions within 48 hours.
What not to do: Do not hack at ice with an axe or hammer. You will damage shingles and flashing, turning a temporary problem into a permanent one. Do not use rock salt, which corrodes metal flashing and degrades roofing materials.
What to do: Fill a pair of pantyhose or tube socks with calcium chloride ice melt. Lay them across the ice dam perpendicular to the eave. The calcium chloride melts channels through the ice, letting trapped water drain. From inside, run a dehumidifier in the attic if you can access one safely.
Ice dams happen because of inadequate attic insulation and ventilation. The emergency fix buys time, but the real solution is improving both. Our articles on heat tapes for ice dam prevention and checking whether your roof insulation is working cover the longer-term fixes.
Key takeaway: Calcium chloride in pantyhose across the ice dam creates drainage channels. Never chip ice off your roof.
How to Get Help Faster
When every roofer you call is booked for two weeks after a storm, a few things improve your odds:
- Call early. Emergency roofers triage incoming calls first thing in the morning. Calling before 7 AM puts you closer to the top of the list.
- Ask for emergency tarping specifically. You are not asking for a full repair. You need temporary stabilization, and contractors can often fit a tarping job into a packed schedule faster than a full project.
- Check with your insurance company. Many carriers maintain a preferred emergency contractor list and can dispatch someone faster than you can find one on your own.
- Ask about Roofster. Weather Vane Roofing’s 24/7 AI chatbot can answer triage questions immediately while you wait for a crew.
Setting expectations helps too: temporary stabilization comes first, permanent repair gets scheduled separately. A good roofer will tell you the same thing.
What Emergency Roof Service Actually Costs
Emergency roof work carries a premium, and knowing the range prevents sticker shock:
- Emergency tarping: $300 to $800
- Minor emergency repair: $250 to $1,000
- Major emergency repair: $1,000 to $3,200+
- After-hours or weekend premium: 25% to 40% above standard rates
Weather Vane’s Repair-First approach means we start with the smallest effective fix to stabilize your home. If that emergency repair leads to a full roof replacement within a year, the $1,000 Repair Credit Guarantee applies the repair cost toward your new roof. The emergency investment is not lost. For a broader look at what roof repairs cost in Michigan, see our comprehensive guide to roof repair costs.
Before the Next Emergency: A 5-Minute Prep List
The best emergency is one that never happens. Five things you can do this weekend:
- Identify your go-to roofer now and save their emergency number in your phone. Do not search for one during a crisis.
- Keep a heavy-duty tarp, furring strips, and screws in the garage. After a major storm, stores sell out fast.
- Know your insurance deductible and keep your agent’s direct number where you can find it at 11 PM.
- Check your attic insulation and ventilation. Adequate insulation and airflow prevent ice dams, which prevent most winter roof emergencies.
- Schedule an annual roof inspection. Catching a cracked vent boot or lifted flashing before it leaks is cheaper and calmer than dealing with it at midnight. Learn more about what to expect from a roof inspection.
Our storm-proofing guide covers preparation in more detail for homeowners who want to get ahead of the next severe weather event.
Weather Vane Is Here When You Need Us
If your roof is leaking right now, call Weather Vane Roofing. We serve Lansing, Owosso, and communities across Mid-Michigan with honest assessments and a Repair-First approach. Quick question? Ask Roofster, available 24/7.
Not an emergency yet? Schedule a free inspection to catch problems before they become one. Every repair is backed by our lifetime workmanship guarantee.